Site-Wide Fix allows you to apply fixes across all your scanned pages, past and future.
This feature is ideal for recurring elements like headers, footers, and navigation menus that appear on multiple pages.
Note
Site-Wide Fix is available to paid Elementor Web Accessibility users.
When to use Site-Wide Fix
Site-Wide Fix is best used for accessibility issues that repeat across pages such as:
- Images or logos that appear in the same header or footer.
- Navigation links or text with recurring color-contrast issues.
This ensures consistency and saves time by automatically applying your fix wherever that element appears.
How to apply a Site-Wide Fix
- Scan a page with Web Accessibility. See: Scan your pages for Accessibility Issues for more informaiton.
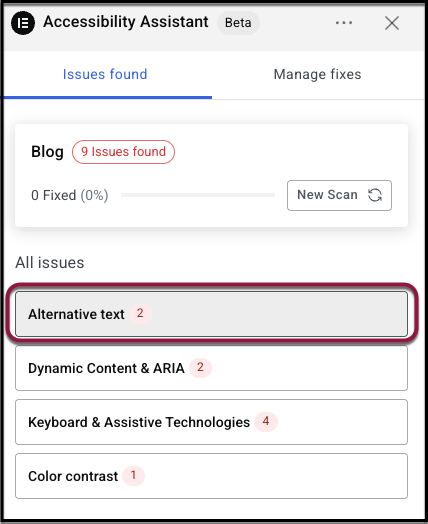
- From your scan results, under “All issues” in the Assistant panel, click on an issue such as Alternative text or Color contrast.
- After you fix an issue (for example, by adding alt text or adjusting color contrast), click the Global “Apply across scans” toggle. When toggled on, it will turn blue.
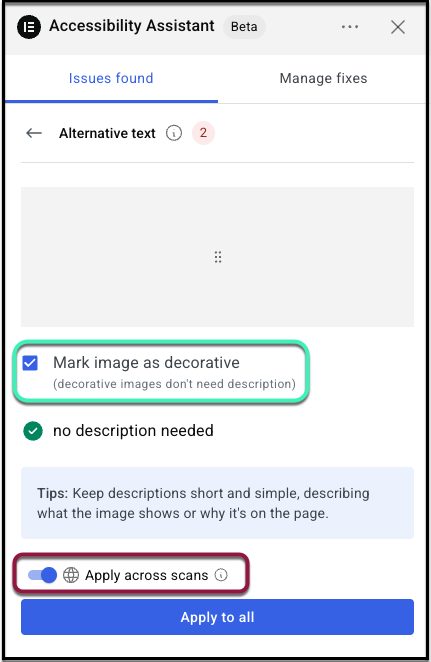
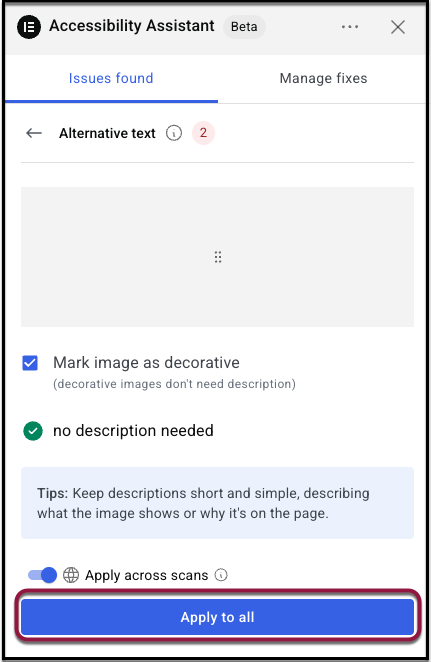
- Click Apply to all. The remediation applies automatically to all matching elements across your scanned URLs: current, past, and future.
For example: If you scanned 5 pages, and on the 6th page you decide to apply the fix across your scanned pages, it will be applied on each of those 6 pages and you won’t see this violation on the next pages you scan. This saves you valuable time when scanning your pages for accessibility issues.
Managing Site-Wide Fixes
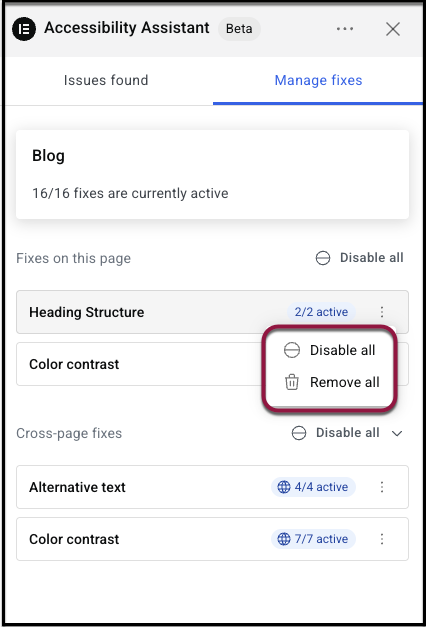
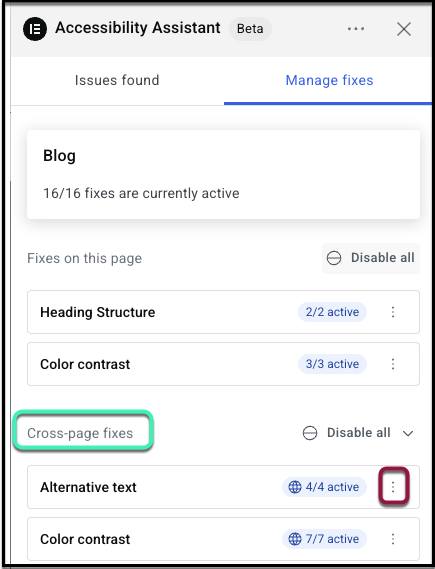
You can view and manage all your Site-Wide Fixes from the Manage fixes section in the Accessibility Assistant dashboard.
Here you can:
- View a site-wide fix (element name, issue type, fix, and last updated date).
- Edit a site-wide fix to update the fix (changes apply across all matching pages.)
- Disable a site-wide fix for one page or for all pages.
- Delete a site-wide fix permanently (removes it from all scanned pages)TipIf an element no longer exists, the Accessibility Assistant will flag the site-wide fix as obsolete and prompt you to remove it.
Disable or enable all fixes
- Open the Accessibility Assistant.
- Click the Manage fixes tab.

- Select where you’d like to disable fixes:
- Disable all fixes on this page: Next to “Fixes on this page,” click Disable all.
- Disable all cross-page fixes: Next to “Cross-page fixes” click Disable all, and then click Disable across scans.
Disable, enable, or remove a fix on a specific page
- Open the Accessibility Assistant.
- 2. Click the Manage fixes tab.
- Under “Fixes on this page” click the three dots on the right-hand side of an issue topic, such as “Heading structure.”

- Select an action:
- Disable/ Enable all: Disabling a fix for the current page stops the rule from applying from that specific page. Enabling the fix reapplies the global fix to the page.
- Remove all: This removes the fixes and marks the accessibility issues as unresolved. This action can’t be undone.
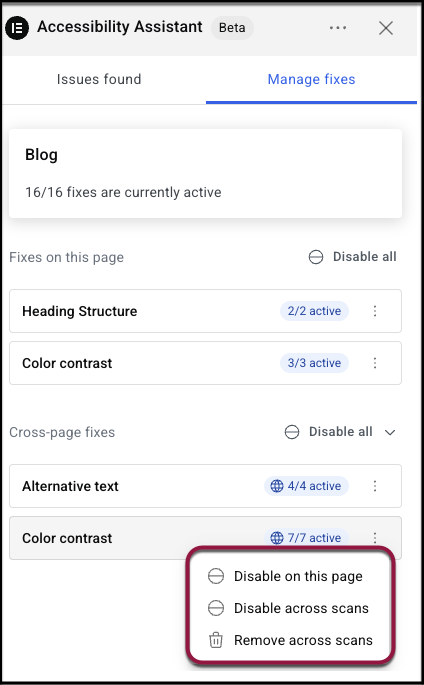
Disable, enable, or remove a fix across all pages.
- Open the Accessibility Assistant.
- Click the Manage fixes tab.
- Under “Cross-page fixes” click the three dots on the right-hand side of an issue topic, such as “Color Contrast.”
- Select an action:
- Disable/Enable across scans: Disabling a fix for the current page stops the rule from applying across all pages. Enabling the fix reapplies the global fix to the page.
- Remove across scans: This removes the fixes and marks the accessibility issues as unresolved across all pages. This action can’t be undone.
- Disable/Enable on this page: You can also enable or disable a fix for the specific page you’re on from here.
What happens when you use site-wide fixes
- Global overrides local: If a page already has a fix for the same element, the site-wide version will take precedence.
- Automatic coverage: The fix applies to any newly scanned pages containing that same element.
- Seamless updates: Editing or disabling a site-wide fix updates all matching elements instantly
.